
How to create and deploy smart contracts on Polkadot?

Evolution in the blockchain space is essential to provide users with improved use cases-specific blockchain networks. While most second-generation blockchains like Ethereum can address the challenges of first-generation blockchains, interoperability remains a significant challenge.
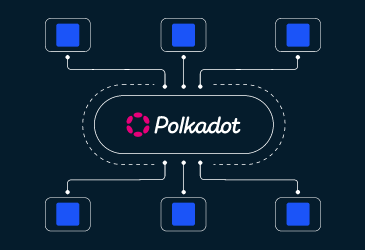
Polkadot provides a solution to the interoperability issue with its ability to connect various heterogeneous blockchains developed as Parachains. Polkadot further enables interoperability between Parachains and external chains like Ethereum via bridges.
Apart from enabling interoperability between Parachains and external blockchains, Polkadot bridges act as a connecting layer that allows enterprises to interact with and access the real-world or non-blockchain databases.
Polkadot facilitates diverse dApp development and blockchain ecosystem development with such benefits. A smart contract is integral to regulating a blockchain or a dApp. Let’s understand smart contract development and its deployment on the Polkadot Network.
- Why should you choose Polkadot for smart contract development?
- What are the tools and technology stack required to build a smart contract on Polkadot?
- How to develop and deploy a smart contract on Polkadot?
- Polkadot development services at LeewayHertz
Why should you choose Polkadot for smart contract development?
Polkadot is a next-generation blockchain protocol that enables interoperability across various blockchains. A dApp built on the Polkadot ecosystem as a Parachain is inherently interoperable with other Parachains in the network. The Parachains are advanced layer-1 blockchains that build up a diverse ecosystem of independent blockchains and allow communication, improving the legacy approach of siloed blockchains.

Following are the other benefits that Polkadot brings:
- Polkadot allows smart contract developers to utilize the underlying benefits of the Polkadot relay chain, its shared security, governance, consensus, and scalability.
- With high flexibility and the facility to develop the Parachain itself, Polkadot eliminates the pain of optimizing any use cases, ensuring fully optimized and more secured services with no downtime.
- Similar to other components and use cases, developers on Polkadot can perform periodic upgrades on the smart contracts, keeping them well functioning and upgraded correspondingly to the latest technologies.
- Smart contracts built for Parachains get robust security from the underlying blockchain- no need to set up a network of miners from scratch or gather validators.
What are the tools and technology stack required to build a smart contract on Polkadot?
Polkadot offers a variety of tools, SDKs (software development kits), PDKs (Parachain development kits), testnet, and blockchain framework to support the development of next-gen web 3 solutions and dApps. The network updates the tools and resources to make the Polkadot ecosystem more relevant and powerful. We have sorted some a concise list of essential tools and resources that are often used for development.
Tools
- Substrate
- Substate developers docs
- Substrate VSCode plugin
- Substrate debug kit
- Diener
- Polkadot Launch
- Halva
- Fork-off Substrate
- SRtool
- sub-bench
- substrate-devhub-utils
- sub-flood
Programming languages
- Rust
- Ruby
- Go
- C++
- Typescript
- AssemblyScript
- Haskell
- Java
- Python
Testnet & SDKs
- Kusama- testnet for ensuring the optimization of the smart contract before mainnet deployment.
- Rococo- Polkadot’s testnet for the Parachian.
Leverage Polkadot's Interoperability via custom parachains
Polkadot Blockchain Development Company
How to develop and deploy a smart contract on Polkadot?
The relay chain seamlessly coordinates the Parachains on the Polkadot network, but it does not itself support the smart contracts. However, you can use Parachain as a blockchain ecosystem to develop a blockchain or a dApp and then use the Relay chain to connect with the main Polkadot Network.
Polkadot uses Substrate as blockchain SDKs that include network logic, transaction queue, web assembly interpreter, and the implementation of elements such as token balances. Substrate currently supports smart contract development in the following two ways.
Frontier EVM contracts
Frontier offers a suite of tools that allow a Substrate-based chain to run EVM contracts natively using a common RPC/API interface.
Substrate contracts
The Substrate is a blockchain framework that supports a multichain future. Polkadot developers use Substrate to quickly develop a blockchain use case and optimize it for better usability.
We will use the Substrate blockchain framework in this guide of the above two methods to develop smart contracts on Polkadot.
1. Install prerequisites on your computer
Installing prerequisites is preparing your computer for Substrate development. Follow the given two steps to get started with the Rust programming language:
Debian/Ubuntu
Execute the following command using a terminal shell:
sudo apt update
#May prompt for location information
sudo apt install -y git clang curl libssl-dev llvm libudev-dev
Arch Linux
Run the following command from a terminal:
pacman -Syu --needed --noconfirm curl git clang
Fedora
Run the following command from a terminal:
sudo dnf update
sudo dnf install clang curl git openssl-devel
OpenSUSE
Run the following command from a terminal:
sudo zypper install clang curl git openssl-devel llvm-devel libudev-devel
For macOS
Execute the following commands in the terminal:
#Install Homebrew if necessary https://brew.sh/
/bin/bash -c "$(curl -fsSL https://raw.githubusercontent.com/Homebrew/install/master/install.sh)"
Make sure Homebrew is up-to-date, install openssl
brew update
brew install openssl
For Windows
#Install Homebrew if necessary https://brew.sh/
/bin/bash -c "$(curl -fsSL https://raw.githubusercontent.com/Homebrew/install/master/install.sh)"
#Make sure Homebrew is up-to-date, install openssl
brew update
brew install openssl
Rust developer environment
Use http://rustup.rs  installer and the rustup tool for managing the Rust toolchain. Install and configure rustup:
# Install
curl --proto '=https' --tlsv1.2 -sSf https://sh.rustup.rs | sh
# Configure
source ~/.cargo/env
Configure the Rust toolchain to the newest stable version, add nightly wasm target and nightly:
rustup default stable
rustup update
rustup update nightly
rustup target add wasm32-unknown-unknown --toolchain nightly
Test your setup
Test your whole setup to ensure that your computer is fully prepared for Substrate development.
Install the Substate contracts node
To support the substrate development, we require built-in contract pallets. For this guide, we are using a pre-configured Substrate node. To use it, run the following command:
cargo install contracts-node --git https://github.com/paritytech/substrate-contracts-node.git --tag v0.10.0 --force --locked
2. Ink! CLI
The next and final tool we need to use for Substrate development is ink!
Install the ink! Command-line utility to make setting up Substrate smart contracts simple and easier. As a prerequisite of this tool. You also need to optimize the contract’s WebAssembly bytecode.
You can directly install the ink! by running the following code:
#For Ubuntu or Debian users
sudo apt install binaryen
#For MacOS users
brew install binaryen
Once you have done the ink! package installation, execute the following command:
cargo install cargo-contract --vers ^1.0 --force --locked
You can now use cargo contract –help and utilize the commands available.
3. Create an Ink! project
The next step is to use the ink! for generating the files required for Substrate smart contract development.
Run the following command from your working directory:
cargo contract new flipper
By running this command, you will create a new folder named flipper which we need to explore later in the development process:
cd flipper/
For ink! contract project
flipper
└─ http://lib.rs  <-- Contract Source Code
└─ Cargo.toml <-- Rust Dependencies and ink! Configuration
└─ .gitignore
1. Build the source code
Since ink! CL automatically creates the source code on the “Flipper” contract; it is considered the simplest smart contract development procedure.
Here, the Flipper contract is a bool that gets reversed from true to false using the flip() function. In this guide, we keep the details straight without deeper details as we walk through more advanced smart contract development processes.
2. Testing your contract code
At the bottom of the source code, we find the simplest test cases that demonstrate and verify the functioning of the smart contract. You can also quickly test the code using the off-chain test environment provided by ink! Testing the code ensures that the code is running as expected.
Run the following command in the project folder:
cargo +nightly test
After that, you will get a successful test compilation:
$ cargo +nightly test
running 2 tests
test flipper::tests::it_works ... ok
test flipper::tests::default_works ... ok
test result: ok. 2 passed; 0 failed; 0 ignored; 0 measured; 0 filtered out
Now that we are confident about the contracts constructed well, you can proceed to compile this contract to Wasm.
3. Building your contract
Compile the smart contract in the Flipper project directory by running the following command:
cargo +nightly contract build
Through this command, you can build a Wasm binary for your ink! The project and the metadata file and a .contract file that combines both. Note that your .contract file is used to deploy the contract on-chain. If everything is done right, you will see a target folder containing the following files:
target
└─ ink
└─ release
└─ ...
└─ .rustc_info.json
└─ CACHEDIR.TAG
└─ flipper.contract
└─ flipper.wasm
└─ metadata.json
Also, let’s have a look at the metadata.json’s structure:
{
"metadataVersion": "0.1.0",
"source": {...},
"contract": {...},
"spec": {
"constructors": [...],
"docs": [],
"events": [],
"messages": [...],
},
"storage": {...},
"types": [...]
}
The above file describes every interface that is used to help you interact with your contract:
- types provide you with the custom data used for the rest of JSON.
- storage demonstrates the storage items your contract manages and ultimately allows you to access them.
- spec file contains information regarding the callable functions that a user can use to interact with the contract, such as constructors and messages. It also contains useful information such as the contract’s events or documents.
4. Running a Smart Contract Node for Substrate
Once you successfully install the substrate-contracts-node, run the following node to start a local development:
substrate-contracts-node --dev
After running the code, you will see the nodes producing the blocks in the terminal.
5. Deploying your contract
The contract deployment process for the Substrate is of two steps:
- Placing your contract on the blockchain
- Creating instances of the contract
1. Upload your contract on the blockchain
With this contract deployment pattern, you can put a contract code like the ERC20 standard on the blockchain for a single time, but you can instantiate it many times. You don’t need to upload the same contract code multiple times as it occupies unnecessary space on the blockchain.
Follow the given steps to upload the contract code and instantiate a single copy of the contract on the top of the blockchain:
- Click the “Add New Contract” button given in the sidebar.
- Click the “Upload New Contract” button given over the “Add New Contract Page.”
- Now, pick the Instantiation account. For example, ALICE.
- Provide a descriptive name to the contract. For example, Flipper Contract.
- Drag the flipper. Contract file into the drag & drop area, which contains the bundled Wasm blob and metadata. The UI will parse the metadata and activate the button to move you to the next phase.
- Proceed further by clicking the “Next button”.
2. Instantiate your contract on the blockchain
Your smart contract exists on the blockchain as an extension of the account. Hence, creating an instance of this contract will generate an AccountId that stores balances managed by the smart contract, allowing the users to interact with the smart contract.
The information that reflects our smart contract is now displayed on a screen. We’ll create a replica of the smart contract as follows:
- Accept the contract Deployment Constructor’s default parameters.
- Accept the default settings. The maximum amount of gas allowed is 200000.
- Select Next.
Once you complete these steps, all the transactions will be queued. Now, review the data and then click “Upload and Instantiate”. Or else, you can go back and modify the inputs.
The moment you click “Upload and Instantiate“, you will see the extrinsic processing instantiateWithCode, and an event will appear, including the new account creation (system. new account) and the contract’s instantiation (contracts. Instantiated). You will be redirected to a fresh page that allows you to interact with the new contract instantly.
Leverage Polkadot's Interoperability via custom parachains
Polkadot Blockchain Development Company
Polkadot development services at LeewayHertz
Intending to build innovative and more useful blockchain use cases for diverse enterprises, the team at LeewayHertz always looks forward to leveraging the latest blockchain technologies. For Polkadot Network, we offer the following services:
Smart contracts
By leveraging the interoperability capabilities of the Polkadot, we develop your project-specific smart contracts to regulate your Parachains, besides offering cross-chain compatibility.
Cross-chain bridges
Our team has proficiency in developing Polkadot bridges to support cross-chain bridging between Polkadot and various blockchain ecosystems.
NFT marketplaces
Leveraging the interoperability element of the Polkadot ecosystem, we develop NFT marketplaces with the cross-chain capability to make NFT trading more feasible.
dApp development
We develop a range of interoperable decentralized applications on the Polkadot network or develop the dApp as a Parachain. These dApps are compatible with various public and private blockchains.
Parachain and Parathread development
We help you develop Parachains and Parathreads on the Polkadot Network and provide them with the pooled security, governance, and scalability capacities of the Relay chain.
Wallet development
We help you create and integrate customized wallets on the Polkadot network to support your decentralized exchange platform, NFT marketplaces, and cross-chain exchanges.
Conclusion
While interoperability is currently the most crucial element in the entire blockchain space, Polkadot allows the connected Parachains to interoperate and share arbitrary data and tokens. For non-Parachains, this blockchain network offers interoperability through cross-chain Polkadot bridges.
Polkadot has two major goals- providing shared security to the Parachains and allowing all the connected chains to interoperate. The network further reduces developers’ time to develop and launch a new chain. Using the Parachain develop kits (PDKs), a Parachain can be developed and launched in only a few weeks or even days.
If you want to enhance the cross-chain capacities of your blockchain solutions or want to get your hands on interoperable blockchain applications, connect with us. We will help you get the right solution with Polkadot.
Author’s Bio


Akash's ability to build enterprise-grade technology solutions has garnered the trust of over 30 Fortune 500 companies, including Siemens, 3M, P&G, and Hershey's. Akash is an early adopter of new technology, a passionate technology enthusiast, and an investor in AI and IoT startups.
Start a conversation by filling the form
All information will be kept confidential.
Insights
How to set up and run a full node on Polkadot?
Learn how to run a full node on Polkadot to build dApp or advanced web3 solutions on the Polkadot Network and the Polkadot-compatible Substrate framework.

How to build a Proof of Existence Blockchain with Substrate?
The Substrate is an open-source, extensible and modular framework designed for building various interoperable blockchain networks like Polkadot. Learn how to build a Proof of Existence Blockchain with Substrate

Cross-chain Web3 Applications on Polkadot
Polkadot supports the development of innovative Web3 applications on its ecosystem, enabling the enterprises to benefit from the attributes of the next-generation web.


